eu-parc.github.io
How to Use Git to Interact with a PARC Module
This page serves as documentation for getting set up and getting started with several basic operations interacting with PARC semantic modules, implemented in ODK, using git and GitHub. It also serves as a worksheet for walking you through the same in the context of a live parc-test-module, which you can follow through step by step to become familiar with some of the ODK basics.
Setting Up As A New Contributor
Cloning the Repository
If you’re starting from scratch, the first thing you’ll need to do is clone the repository containing the PARC module you want to work with. To do this, navigate to the repository on GitHub and click the “Clone or download” button.
You can then copy the repository’s URL from the box that appears.
Once you’ve copied the URL, you can use the git clone command to clone the repository to your local machine. For example, to clone the parc-test-module repository, you can run the following command in your terminal:
git clone <https://github.com/eu-parc/parc-test-module.git>
This will create a new directory on your local machine with the same name as the repository (parc-test-module in this case) and download the contents of the repository into that directory.
Developing in a branch
If you are new to ODK, ontologies, or git, or if you are planning a lot of work at once that may conflict with other work on-going in the module, you may want to develop your changes in a branch. You can then later make a pull request to request that your changes be imported into the main ontology. If you’re treating this document as a worksheet, then it may be wise to do it in a branch:
git checkout -b my-new-branch
Tip: branch names have to be unique, so pick your own!
Setting up an ID range
The parco-test-module-idranges.owl file is used to manage the identifiers used in the ontology. Each editor is assigned a range of numerical IDs that they should use to provision new terms. These are defined to avoid
To add your own entry to the parco-test-module-idranges.owl file, follow these steps:
- Navigate to
src/ontologyin the repository -
Open the
parco-test-module-idranges.owlfile. It will look something like this: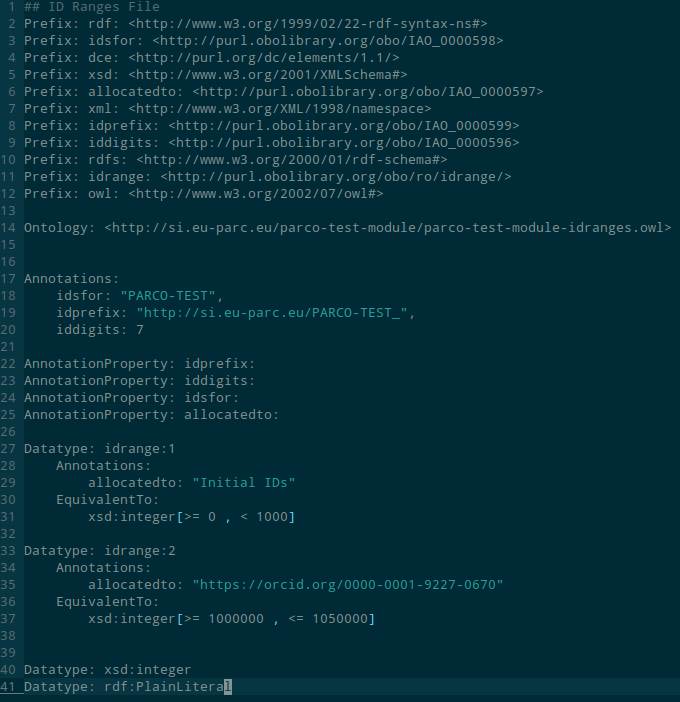
-
This file contains some general information about the ID structure of the ontology, and the existing contributors. You have to develop your own block that will look something like:
 Datatype: idrange:2
     Annotations:
         allocatedto: "https://orcid.org/0000-0001-9227-0670"
     EquivalentTo:
         xsd:integer[>= 1000000 , <= 1050000]
You can copy a previous block, but there are three things you will need to change:
- The number 1 in
Datatype: idrange:1should be changed to be an increment of 1 above the greatest that currently appears in the file. - The
allocatedtoline should be changed to refer to your ORCID IRI. - The
axsd:integer[>= 1000000 , <= 1050000]should be changed to a range that does not intersect with any other range in the file. This will define your ID range. Typically, you can just define a range of 50000 starting from one more than the previously greatest range limit. I imagine 50,000 classes will probably be enough for you.
- The number 1 in
- Now you can save the file, commit and push the changes to the repository:
git commit -am 'add self as new contributor'
git push
Set up ODK Docker
ODK is managed via a docker image that contains robot and some other scripts. It will be used for building the ontology and reconfiguring the ODK setup.
This page contains instructions, however the main steps you need to take are
- Install docker using instructions relevant to your platform
-
Install the docker image for ODK:
docker pull obolibrary/odkfull
You won’t need to set up the wrapper script like the linked page describes, because the module repository includes a wrapper script, which sits at src/ontology/run.sh (note - you should always run this when you have src/ontology as your current working directory).
Tip: You can also get away with some tasks by installing robot locally, which will allow you run make unqualified. You’re probably better off just installing the docker though.
Building the ontology
We will now cover how to build the ontology. We will cover this here because you have to do it to execute certain changes later:
- Navigate to the
src/ontologydirectory -
Run the following command to build the ontology
sh run.sh makeThis will parse and build all changes to templates, imports, and edits, into the relevant OWL files.
Tips
-
It can be really slow to re-pull and re-build all of the import modules when you are just trying to make changes to e.g. the import file. To tell make not to bother rebuilding the import modules you can run:
sh run.sh make IMP=false
Editing the Ontology
Now we will look at multiple ways to define, modify, and interact with the ontology. The method you use to define a new class will sdp
Imports
Much of the time, a class that we want in our module will already exist in another ontology. To encourage orthogonality and linkage of data, we should use import external ontology terms into our module where possible.
You can identify external classes to include by searching an ontology repository. Some popular repositories include:
Importing a class from an already imported ontology
If the module already includes some classes from the ontology you want to import a class from, then you are in luck: the process is relatively easy. In our example, we are going to be importing the term variability of colour (PATO:0001611) from PATO
- Check for a corresponding text file for the ontology you want to import a term from in
src/ontology/imports(if there is not one, you will have to create a new import module (see next section)). In this case, we identifysrc/ontology/import/pato_terms.txt -
We can open that file to see the list of terms that are already being imported from that ontology
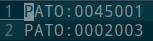
- Now we just create a new line and add the ID of the ontology term that we want to include. In this case PATO:0001611. Now we can save the file.
- Now we have to re-build the ontology to re-build the module (see the ‘build the ontology’ section for more information):
- Navigate to the directory in your local copy of the repository.
- Run the
makecommand
This will rebuild the import module, which is stored in src/ontology/import/pato_import.owl. You can open this to check that the term has been correctly imported.
Remember to git commit and push your changes!
Importing a class from a new ontology
To do this, we have to edit the setup of the ODK installation, which can be a bit of a pain, since there are a few things to edit. Here we’re going to add a new import module for the Unit Ontology (UO).
- Open the module config file at
src/ontology/parco-test-module-odk.yaml - Locate the import_group section
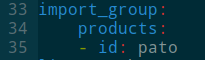
-
We just have to add another entry for uo here, so edit it to look like:
import_group: products: - id: pato - id: uo -
Now we have to rebuild the repository:
 sh run.sh make update_repo
 sudo chown -R myuser:myuser ../../*
In the second line, replace ‘myuser’ with your terminal username. This has to be done because the run.sh script uses docker, and for some reason sets the ownership of the files as root. I don’t know why this is the case, perhaps it can be fixed with some manipulation of the docker setup.
-
Now we have to add the import to the ontology. Open parco-test-module-edit.owl and find the import closure:

-
Add a new line for the UO import:
Import(<http://si.eu-parc.eu/parco-test-module/imports/uo_import.owl>) -
Now we have to open the catalog-v001.xml file

-
Add a new line for UO before </group>:
<uri name="http://si.eu-parc.eu/parco-test-module/imports/uo.owl" uri="imports/uo.owl"/> -
Now we should have corresponding files for uo in the src/ontology/imports folder, and you can follow the instructions from the previous section to import classes from there.
You can see that the above configuration file offers a lot more configurability for import modules, which we won’t go into here. Some of them are very useful, and you may want to consider, such as the modularisation method encoded by ‘module_type_slme.’
Editing the vocabulary
The vocabulary for the module is managed using templates. Templates are flat TSV files that you can edit using a spreadsheet, which ODK can then compile into an OWL module to be included in the release files, and onto which conceptual modelling features can be added. In this example
- Navigate to the
src/templates/directory in your local copy of the repository. -
Open the TSV file, in this case
vocabulary.tsvin a spreadsheet editor, such as Microsoft Excel, LibreOffice, or Google Sheets.
- Add a new row to the spreadsheet with the details of the new class. Be sure to follow the formatting guidelines specified in the comments at the top of the TSV file.
- Save the spreadsheet in TSV format.
- You can now rebuild the ontology to construct the
vocabulary.owlfile
Notes and tips:
- parco: is a special prefix that encodes the base PARC IRI, and can be used as a shorthand. For example parco:TEST_0000001 corresponds to an IRI of http://si.eu-parc.eu/PARCO_TEST_0000001
Editing the Conceptualisation
The vocabulary templates give us a flat organisation of concepts for our domain, however we may want to add axioms to these, such as a structure. We can do this in the main module OWL file. In this example, we’re going to be using Protege, however you can use whatever platform you like. The edit file is conveniently stored in OWL functional syntax, which makes it not too bad to edit with a plain text editor (well, at least in comparison to XML).
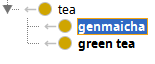
Here we can see the terms in the vocabulary template created earlier:
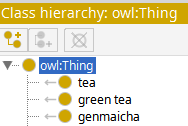
And we are free to drag them around as we see fit/add axioms etc:

Which, when saved, will be saved in the -edit file, and therefore in the ontology.
Managing Releases
Building a New Release
To build a new release, follow these steps:
- Navigate to the
src/ontologydirectory in your local copy of the repository. - Run the following command to prepare the release:
sh run.sh make prepare_release
This will build the ontology, run all of the pre-release checks (e.g. is the ontology consistent), and then copy the product files to the top of the repository.
Creating a New Release on GitHub
After you’ve prepared the release using the make prepare_release command, and pushed it to the git repository, you need to create a new release on the corresponding GitHub page.
-
To create a new release, navigate to the repository on GitHub and click the “Releases” tab. Then, click the “Draft a new release” button. Otherwise, you can click the ‘create a new release’ from the bottom right of the main repository page

-
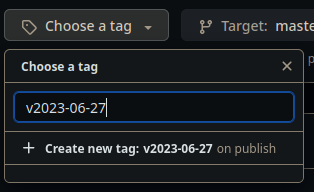
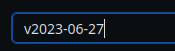
Enter a tag for the release name, usually vYYYY-MM-DD is a good and easy choice.
-
Enter this also in the title field
-
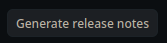
Click generate release notes to automatically populate the release notes with the commit messages/issues etc of the repository since the last release
-
Click ‘attach binaries,’ and upload the .owl and .obo fiels from the top level of your module.
Then you can click submit to release the ontology!¬
Notes
- We don’t currently have any kind of provisioning for the OWL files set up (i.e. to make them available at si.eu-parc.eu)
- You can link to the most recent release of the module with e.g. https://github.com/eu-parc/parco-test-module/releases/latest